The first frost hadn’t even arrived when I began noticing the subtle signs: the golden cast of the afternoon sun, the dew that lingered just a little longer each morning, the silence in the garden once filled with bees. Winter was on its way, and my greenhouse, my little glass sanctuary of green life, wasn’t ready.
But this wasn’t my first cold season with it. Last year, I learned the hard way that ignoring winter prep is a fast track to dead seedlings, cracked pipes, and a soggy mess. That time, a surprise snowstorm collapsed one of the inner support beams and I lost half my spinach seedlings. Not again. This time, I vowed, I would prepare. Really prepare. And I want to take you through exactly what I did, step by step, not from a textbook, but from muddy gloves, thermal coffee mugs, and real-life greenhouse grit.
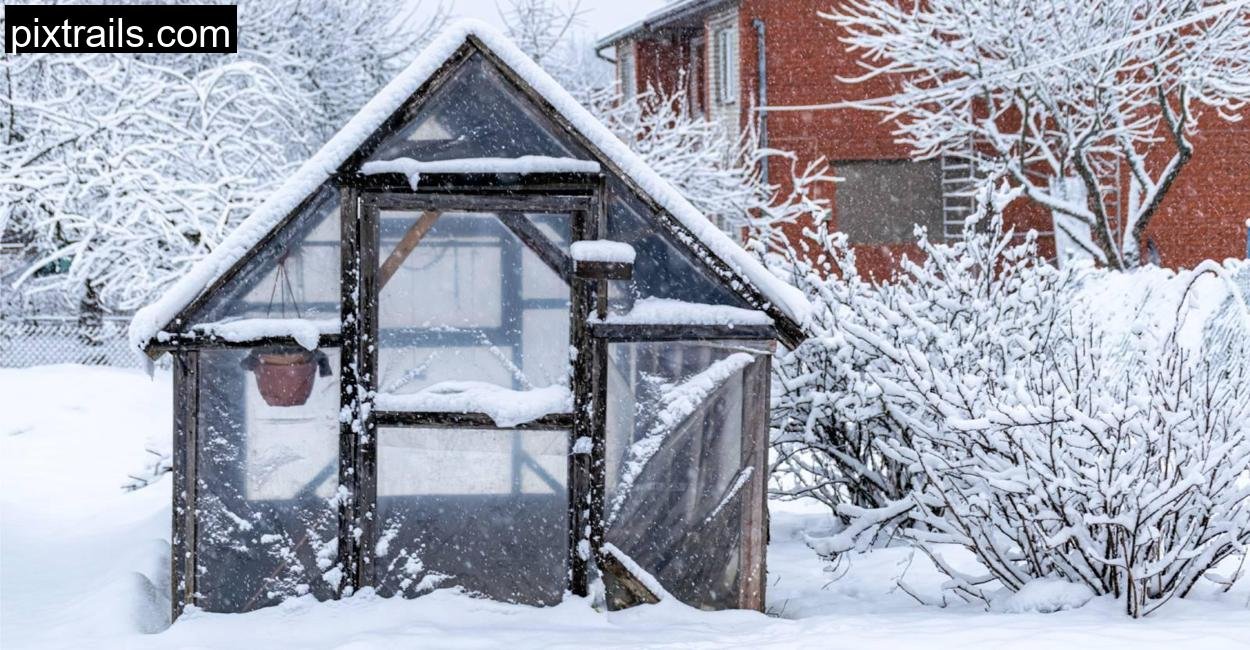
A Greenhouse in Winter: The Dream and The Dilemma

My greenhouse is nothing fancy, a 10×14 wood-framed structure with polycarbonate panels, a gravel floor, and a basic electric heater rigged to a thermostat. It sits at the far end of our backyard, slightly shielded by a row of wind-battered junipers.
Last October, I imagined myself harvesting crisp lettuce, crunchy radishes, and maybe even some hardy herbs right through January. But dreams like that don’t come without work. Winter in our part of Germany gets brutal, icy rain, snowdrifts that curl up to the back door, and wind that howls like a lost dog across the fields. My greenhouse needed to become more than a plant shelter; it needed to be a fortress.

Structural Check – Bolts, Bracing, and Broomsticks

I started with a mug of coffee in hand and a slow walk around the greenhouse. The devil, as I’ve learned, is always in the details.
I checked every bolt, hinge, and joint, even the ones that were “probably fine.” Turns out, they weren’t. Two bolts on the east-facing side had worked themselves loose, and a small diagonal brace had cracked at the joint. If I hadn’t noticed, a heavy snow could have caved it in again.
I replaced the cracked brace with a sturdy 2×4, tightened the loose bolts, and added additional vertical supports at each corner, just in case. Inside the structure, I installed an overhead brace, a wooden crossbar, under the ridge beam. That’s where snow collects the most.
And that broomstick? That’s the unsung hero of greenhouse maintenance. I leaned a long-handled broom just inside the door. When snow starts piling up on the roof, that’s what I use to gently push it off before it turns into an avalanche.
Sealing the Envelope
Even the tiniest draft can suck the warmth right out of your greenhouse. I discovered this when I felt a faint breeze by the baseboard last winter, and my seedlings shivered accordingly.
This time, I went all in with a weatherproofing kit. I sealed every joint in the baseboard with exterior-grade silicone and added weather stripping around the door. The biggest upgrade? Installing a second layer of poly sheeting on the inside walls using wooden battens. It created an air gap, like double glazing, that made an immediate difference.
I also removed the summer shade netting from the roof panels to let in every drop of low-angle winter light. Light is scarce enough in winter, any shade is your enemy.
Heating and Energy Systems – The Greenhouse Heartbeat
Then came the part that made my partner nervous: heat and power checks. If you’re relying on electricity for heat, even partially, a failure can wipe out your crops overnight.
I started by cleaning out the heater vents with a can of compressed air. Then, I recalibrated the thermostat with a digital thermometer. Last year it was off by 3°C, enough to trip the heater on too late or too early. That single adjustment saved me a fortune on the electric bill.
We also have a small kerosene backup heater for emergencies. I checked the fuel, cleaned the wick, and tested ignition. It fired up with a comforting whoosh and slight whiff of nostalgia, it reminded me of my grandfather’s greenhouse.
And yes, I made sure our backup generator was ready with fresh oil and a full tank of fuel. When you live in a region where power outages are a winter reality, that’s not paranoia. It’s insurance.
Water Woes and Wins

Watering in winter might sound simple, but frozen hoses and burst fittings are no joke. I drained the main outdoor hose and wrapped all exposed pipes in foam insulation. I also added a thermostatically-controlled heat cable to the water line inside the greenhouse.
I cleaned the water filters and flushed the tanks. Condensation buildup had caused some minor mildew, so I scrubbed the interior of the cold water tank with vinegar and rinsed it thoroughly. The hot water tank needed a pressure reset, another detail I ignored last year and paid for with erratic flow and lukewarm soil soaks.
Plants, Compost and Cozy Corners
With the infrastructure ready, I finally turned my attention to the living things. I grouped my trays of seedlings, winter greens like spinach, arugula, and pak choi, closer together, partly for ease of care, partly for shared warmth.
I also introduced an old trick: a compost pile in a corner of the greenhouse. It’s not glamorous, but as it decomposes, it releases gentle heat. A natural hot water bottle for the whole space.
I covered delicate trays with fleece at night and added bubble wrap around a few large pots. The biggest winners of all were the lettuce varieties in raised beds along the southern wall, they absolutely loved the consistent warmth and light.
What I Grew Through Winter
Thanks to all this prep, I harvested fresh salad greens right through February. Spinach, mustard greens, claytonia, and even some baby carrots. The smell of soil and green life in the dead of winter? That’s something magical.
I’d sit inside the greenhouse with a warm thermos of tea, surrounded by green in a world of grey. The snow tapped softly on the panels, the heater purred, and I’d think, this is why I do it.
Final Thoughts
Preparing your greenhouse for winter isn’t just about plants, it’s about reclaiming a bit of life and color when the world outside turns grey. It takes effort, yes. But standing inside that warm little room, snipping a bowl of fresh salad in January? That’s the kind of quiet joy that makes it all worthwhile.
Can I use a greenhouse during winter without heating it?
Yes, but only for cold-hardy crops. Use row covers or fleece inside, and group plants for shared warmth. You can also add compost piles or water barrels to store thermal mass.
What’s the ideal winter greenhouse temperature?
For cool-season crops, 35–45°F (2–7°C) at night is usually fine. For more tender crops, keep it above 50°F (10°C). Always use a calibrated thermometer.
How do I insulate a greenhouse for winter?
Add bubble wrap or double-layered plastic sheeting inside. Seal gaps and add insulation around baseboards and doors. Thermal mass (water barrels, stone floors) also helps.